“BMMaker”的版本间的差异
BallanceBug(讨论 | 贡献) 小 |
|||
| (未显示同一用户的1个中间版本) | |||
| 第1行: | 第1行: | ||
{{Languages|zh|BMMaker/zh}} | {{Languages|zh|BMMaker/zh}} | ||
| − | |||
{{Appbox | {{Appbox | ||
| 第15行: | 第14行: | ||
}} | }} | ||
| − | '''BMMaker''' is a tool used in [[mapping]] for mass production of [[floor]]s. It generates | + | '''BMMaker''' is a tool used in [[mapping]] for mass production of [[floor]]s. It generates MS scripts, which is a type of script that can be read and executed by [[3ds Max]]; BMMaker itself does not serve as a model generator, but a tool that generates the script which can be executed to generate models in 3ds Max. |
| − | + | No more versions other than the original one have been released. | |
| − | Because of some problems | + | Because of some problems of the floor model used in the original version (such as cracks and too many vertices), a version fixing that was made by [[User:BallanceBug|BallanceBug]] in January 2019 and released the next month, and a further repaired version was made again in September of the same year. |
== Download == | == Download == | ||
| 第26行: | 第25行: | ||
{| class="wikitable" | {| class="wikitable" | ||
! Version !! Date !! Download | ! Version !! Date !! Download | ||
| − | + | |- | |
| − | + | | 2019 fixed version || 2019-09-14 || '''[[:File:BMMaker-2019.zip]]''' | |
|} | |} | ||
== Compatibility == | == Compatibility == | ||
| − | + | The program is written in Visual Basic 6. Therefore, it can run on most machines, which is convenient mappers. | |
| − | + | Windows 10 system users may encounter compatibility or lag issues when trying to run BMMaker. The former can be solved by setting compatibility (to Windows 7), while the latter just needs to wait for a while. | |
| − | Unlike Map Editor, the minimum 3ds Max version required by BMMaker is only 3ds Max 9. | + | Unlike [[Map Editor]], the minimum 3ds Max version required by BMMaker is only 3ds Max 9. |
== How to use == | == How to use == | ||
| − | This section will guide you how to use BMMaker. In this tutorial, | + | This section will guide you how to use BMMaker. In this tutorial, operations are performed in Windows by default. If you are using other operating systems, alternative methods may be find. |
| − | === | + | === Drawing Pic.bmp === |
[[File:Bmmaker-example.png|400px|thumb|right|An example of Pic.bmp]] | [[File:Bmmaker-example.png|400px|thumb|right|An example of Pic.bmp]] | ||
[[File:Bmmaker-ExampleResult.png|300px|thumb|right|An example of Pic.bmp]] | [[File:Bmmaker-ExampleResult.png|300px|thumb|right|An example of Pic.bmp]] | ||
| − | First,open Pic.bmp in the program directory, and then | + | First, open Pic.bmp in the program directory, and then blank the original painting, which is the preset and drawn graphics in the upper part. Then you can start drawing your own floor. |
| − | |||
| − | |||
| − | + | It is recommended to enlarge the drawing 6 or 8 times before drawing to for easier viewing and increasing the drawing accuracy. Attention must be paid to that the pavement is two pixels wide. Different colors represent different floor types. The following table is a reference to adjust the colors to draw different roads; the built-in color picker tool can also be used to draw the colors of the legend in the lower part of Pic.bmp. Wrong colors will cause failures in recognition of the types of floors. Also, be careful not to paint on the edges of the canvas. | |
{| class="wikitable" style="font-size: 0.92em" | {| class="wikitable" style="font-size: 0.92em" | ||
|- | |- | ||
| − | ! Corresponding | + | ! Corresponding floor type !! Color !! Color value |
|- | |- | ||
| − | | Flat | + | | Flat || {{Square|1em|#000000}} Black || #000000 (RGB: 0, 0, 0) |
|- | |- | ||
| − | | | + | | Profile (Including raised road edges) || {{Square|1em|#800080}} Purple || #800080 (RGB: 128, 0, 128) |
|- | |- | ||
| − | | | + | | ProfilFlat (profile-flat conversion) || {{Square|1em|#316AC5}} Blue || #316AC5 (RGB: 49, 106, 197) |
|- | |- | ||
| − | | | + | | Profile platform (lower floors inside) || {{Square|1em|#808000}} earth green || #808000 (RGB: 128, 128, 0) |
|- | |- | ||
| − | | [[ | + | | [[Paper transformer]] || {{Square|1em|#00FFFF}} sky blue || #00FFFF (RGB: 0, 255, 255) |
|- | |- | ||
| − | | [[ | + | | [[Wood transformer]] || {{Square|1em|#FF8000}} orange || #FF8000 (RGB: 255, 128, 0) |
|- | |- | ||
| − | | [[ | + | | [[Stone transformer]] || {{Square|1em|#00C000}} green || #00C000 (RGB: 0, 192, 0) |
|- | |- | ||
| − | | | + | | Edgeless floor (for jointing other types of floors) || Other colors, with the exception of white #FFFFFF || - |
|} | |} | ||
{{BrClear}} | {{BrClear}} | ||
=== Analysis and generation of scripts === | === Analysis and generation of scripts === | ||
| + | |||
| + | {{Translation}} | ||
After drawing the road and saving Pic.bmp. You can run the program itself: Engineering 1.exe, click in turn: import pic.bmp and start profiling. After clicking to start profiling, it will freeze for a period of time until the parsing is completed. At this time, the program may become unresponsive and you can ignore it. In addition, the program also provides a text box, which is located above the import pic.bmp button. It is used to control the generated height. The default is 0. When making a multi-layered pavement, you can control the height of the generated pavement (because Bmmaker converts 2D graphics, so The generated pavement must be on a plane.) The program maker recommends that when multi-layer pavements need to be generated, the pavement interval is recommended to be 5, which is increased by 5 each time the pavement is generated. | After drawing the road and saving Pic.bmp. You can run the program itself: Engineering 1.exe, click in turn: import pic.bmp and start profiling. After clicking to start profiling, it will freeze for a period of time until the parsing is completed. At this time, the program may become unresponsive and you can ignore it. In addition, the program also provides a text box, which is located above the import pic.bmp button. It is used to control the generated height. The default is 0. When making a multi-layered pavement, you can control the height of the generated pavement (because Bmmaker converts 2D graphics, so The generated pavement must be on a plane.) The program maker recommends that when multi-layer pavements need to be generated, the pavement interval is recommended to be 5, which is increased by 5 each time the pavement is generated. | ||
| 第90行: | 第89行: | ||
=== Welding pavement === | === Welding pavement === | ||
| + | {{Translation}} | ||
After that, there are cracks on the road(As shown below, after zooming in the picture, you can see that there are black spots in the rendering, that is, cracks),So we need to repair the cracks. | After that, there are cracks on the road(As shown below, after zooming in the picture, you can see that there are black spots in the rendering, that is, cracks),So we need to repair the cracks. | ||
| 第104行: | 第104行: | ||
Then you can export to NMO file. For the export tool, please refer to [[Max2Virtools/zh|Max2Virtools]]. | Then you can export to NMO file. For the export tool, please refer to [[Max2Virtools/zh|Max2Virtools]]. | ||
| − | == | + | == Defects == |
| + | {{Translation}} | ||
* The author needs to make a lot of adjustments manually, and the operation is tedious. | * The author needs to make a lot of adjustments manually, and the operation is tedious. | ||
* The size of the pavement produced is 2.5x2.5, and the original version is 5x5. Therefore, the number of vertices created by BMMaker is larger, and the file size is larger than the original pavement, which is not conducive to streamlining the map. | * The size of the pavement produced is 2.5x2.5, and the original version is 5x5. Therefore, the number of vertices created by BMMaker is larger, and the file size is larger than the original pavement, which is not conducive to streamlining the map. | ||
2020年4月6日 (一) 16:44的最新版本
| Chinese version / 中文版: | BMMaker/zh |
|---|
| BMMaker | |
|---|---|
 Interface of BMMaker | |
| Basic Infomation | |
| Author | 2jjy |
| Suitable for | Mapping |
| Dependency | 3ds Max needed for further processing |
| Release Date | 19 June 2019 (15 years, 7 months ago) |
| Project Link | - |
| Development Status | Dormant |
BMMaker is a tool used in mapping for mass production of floors. It generates MS scripts, which is a type of script that can be read and executed by 3ds Max; BMMaker itself does not serve as a model generator, but a tool that generates the script which can be executed to generate models in 3ds Max.
No more versions other than the original one have been released.
Because of some problems of the floor model used in the original version (such as cracks and too many vertices), a version fixing that was made by BallanceBug in January 2019 and released the next month, and a further repaired version was made again in September of the same year.
目录
Download
It is recommended to download the 2019 fixed version.
| Version | Date | Download |
|---|---|---|
| 2019 fixed version | 2019-09-14 | File:BMMaker-2019.zip |
Compatibility
The program is written in Visual Basic 6. Therefore, it can run on most machines, which is convenient mappers.
Windows 10 system users may encounter compatibility or lag issues when trying to run BMMaker. The former can be solved by setting compatibility (to Windows 7), while the latter just needs to wait for a while.
Unlike Map Editor, the minimum 3ds Max version required by BMMaker is only 3ds Max 9.
How to use
This section will guide you how to use BMMaker. In this tutorial, operations are performed in Windows by default. If you are using other operating systems, alternative methods may be find.
Drawing Pic.bmp
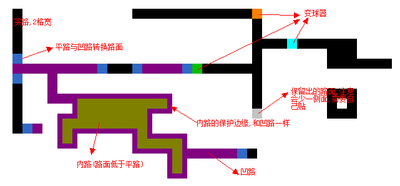
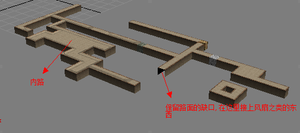
First, open Pic.bmp in the program directory, and then blank the original painting, which is the preset and drawn graphics in the upper part. Then you can start drawing your own floor.
It is recommended to enlarge the drawing 6 or 8 times before drawing to for easier viewing and increasing the drawing accuracy. Attention must be paid to that the pavement is two pixels wide. Different colors represent different floor types. The following table is a reference to adjust the colors to draw different roads; the built-in color picker tool can also be used to draw the colors of the legend in the lower part of Pic.bmp. Wrong colors will cause failures in recognition of the types of floors. Also, be careful not to paint on the edges of the canvas.
| Corresponding floor type | Color | Color value |
|---|---|---|
| Flat | Black | #000000 (RGB: 0, 0, 0) |
| Profile (Including raised road edges) | Purple | #800080 (RGB: 128, 0, 128) |
| ProfilFlat (profile-flat conversion) | Blue | #316AC5 (RGB: 49, 106, 197) |
| Profile platform (lower floors inside) | earth green | #808000 (RGB: 128, 128, 0) |
| Paper transformer | sky blue | #00FFFF (RGB: 0, 255, 255) |
| Wood transformer | orange | #FF8000 (RGB: 255, 128, 0) |
| Stone transformer | green | #00C000 (RGB: 0, 192, 0) |
| Edgeless floor (for jointing other types of floors) | Other colors, with the exception of white #FFFFFF | - |
Analysis and generation of scripts
| Translation needed | ||
|---|---|---|
After drawing the road and saving Pic.bmp. You can run the program itself: Engineering 1.exe, click in turn: import pic.bmp and start profiling. After clicking to start profiling, it will freeze for a period of time until the parsing is completed. At this time, the program may become unresponsive and you can ignore it. In addition, the program also provides a text box, which is located above the import pic.bmp button. It is used to control the generated height. The default is 0. When making a multi-layered pavement, you can control the height of the generated pavement (because Bmmaker converts 2D graphics, so The generated pavement must be on a plane.) The program maker recommends that when multi-layer pavements need to be generated, the pavement interval is recommended to be 5, which is increased by 5 each time the pavement is generated.
Generate pavement
After the parsing is completed, a New.ms file will be generated in the program directory. We need to open Maker.max (requires 3ds Max 9 and above), delete the excess pavement (if you have used this file for several generations before), only part of the required pavement is retained: 
Then just generated the New.ms script. Just click MAXScript-Run Script on the menu.
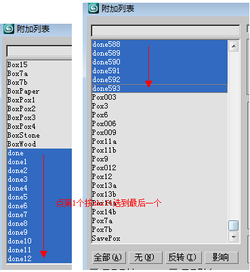
Select any of the generated road blocks, right-click to convert to editable polygons, and click a boxed button next to Attach. Append all road blocks with done words (from done to the last donexxx)
Welding pavement
| Translation needed | ||
|---|---|---|
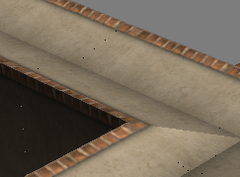
After that, there are cracks on the road(As shown below, after zooming in the picture, you can see that there are black spots in the rendering, that is, cracks),So we need to repair the cracks.
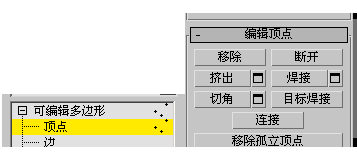
After the attachment is complete, expand the editable polygon editor, click on the vertices, and press Ctrl + A to select all vertices. Then in the edit vertices below, click Weld. You can see that the vertices are much less and the cracks have disappeared after welding.
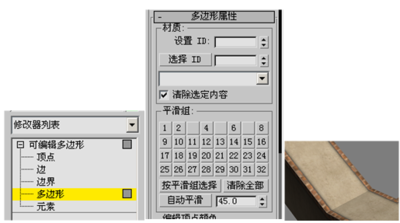
However, after welding, the apex will be smoothed. For example, the slope change cannot be seen on the up and down slopes. In this case, you need to manually cancel the smoothing group. With the polygon modifier, select all faces and click to clear all smoothing groups, as shown in the figure, so the edges and corners are clear.
Then you can export to NMO file. For the export tool, please refer to Max2Virtools.
Defects
| Translation needed | ||
|---|---|---|
- The author needs to make a lot of adjustments manually, and the operation is tedious.
- The size of the pavement produced is 2.5x2.5, and the original version is 5x5. Therefore, the number of vertices created by BMMaker is larger, and the file size is larger than the original pavement, which is not conducive to streamlining the map.
- Only simpler roads can be made.
