Default levels
| Chinese version / 中文版: | 原版关卡 |
|---|
This article is about the 13 levels that came with the original Ballance 1.13. For the 14th and 15th levels in the Ballance bar rumors, please see Power and Ability Levels. |

The Default levels refer to the 13 levels that come with the original Ballance (13 of which are "downloadable content (DLC)" , which can be downloaded from Ballance's official website (http://www.ballance.org[1]) (see Ballance/#History section).
Most of the existing Ballance installation packages have directly includes all levels from levels 1-13 of the original version. Note: "Level A, section B" is abbreviated as "A-B".
History
On April 2, 2004, Ballance, which contains 12 levels, was released in Europe; in September of that year, the 13th level was released on the Ballance official website as a supplement. [2] In October of the same year, a European player uploaded a video of himself passing the 13th level[3], the earliest recorded video to complete all levels.
Introduction
In the initial state of Ballance, players are only allowed to enter level 1 or level 13 (Twilight zone). Clear The first level will unlock the second level, and the second level will unlock the third level, and so on. [4]
Levels (except for the demo level) are stored in the NMO file format in the %AppData%\3D Entities\Level folder, and the file name format is Level_xx.NMO.
Ballance Attached Help Documentation contains clearance help for levels 1 to 12.
Level 1
There are only 4 sections in the initial level. There will be a tutorial prompt every time you start, and you can skip the tutorial by pressing Q. Also due to the camera switch mentioned in the tutorial, this is the only map where the initial camera is oriented in the opposite direction to the path of the level.
The difficulty of this level is very low, and wide or concave roads are mostly used, with extensive use of protective guardrails. This level also introduces the box, extra life, transformer, extra point, prop ball, dome, falling stone, and slider, but there are strict protection measures around the obstacles.
There is no paper transformer in level 1. This may be because the paper ball is uneven, and it is not easy for beginners to make it roll smoothly.
The help document accompanying the Ballance game mentions that "a extra point is hidden" and its location is in the two boxes built up above the large platform in the second section.
Level 2
This level introduces the paper ball, the paper transformer, and the ventilator. In addition, in order to block paper balls, the bascule bridge also appeared; related to it are seesaw and stopper used to pad the bascule bridge and seesaw.
The first section has large slanted wooden boards and the fifth section has chaotic small square wooden boards. They are not difficult, just try and pass with care.
In the third section, for the first time, a part that requires more logical thinking appears. After the paper ball is turned into a stone ball by the fan, the stone ball will break the cork bridge, so it cannot go back the same way; the player needs to find another path to make the stone ball push off the baffle and pass through this section.
In the fourth section, a large wave board appeared for the first time. One has to keep pressing the forward button when passing the wave board, otherwise it will be stuck in the trough and difficult to escape. Fortunately, protection measures are provided here, and players can try to master the essentials many times.
Level 2 to Level 10 and Level 13 each have 5 sections.
Level 3
This level introduces side rails, and it is required for wooden or paper balls to stick to it and pass. This will be the first difficult point, but fortunately, when the side rail first appeared, a platform was provided below it to ensure that the player would not fall.
In section 2, there is a a rail slop with a huge drop. This is also the game's first "stone ball rollercoaster" area. It may not be easy for the player to throw the stone ball to the upper rail to leave when the player tries for the first time, but the first stone ball in this section provides protection measures when the stone ball leaps, so that the player can continue even if it fails; although the second place has no protection, it provides an easily obtainable extra life which allows the player to repeat.
Players can also use paper balls to jump directly from the initial platform in the second section, which is very ornamental and easy to achieve. In addition, 3-4 includes the turnstile and T-bridge as part of a small array (including a linkage mechanism).
Level 4
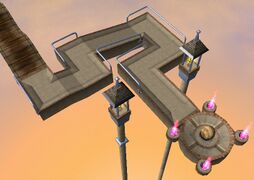
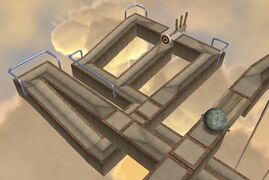
There are no new objects in this level, but the terrain is quite different from the first three levels: a large number of arches are used.
The first difficulty is in the first section, with the convex arch. Beginners can easily fall off here. Try to enter when the wooden ball is stable at the bottom of the concave arch wood in front, and try to not press other keys during this period, and only press the opposite key when the ball is offcenter. It is more difficult to get the last extra point in this section: players need to go around the lamp post near the side of the convex arch to get this.
In the second section, as long as the stone ball is going down, press and hold the key opposite to the direction of the slide, and you can pass it carefully. If you still find it difficult, you can push down the boxes and prop balls on the highest platform as a buffer.
The falling prop stone ball array in the third section is not difficult, just press the forward button and don’t let go. Just steer left or right when a stone ball is near the player ball.
The third platform in the fourth section is the first place in the original map where an alternate path is required. The original route is to drop from the upper road in the state of a wooden ball to avoid paper ball changer, so that the wooden ball can fall from the top of the fourth platform. Of course, there is a shortcut for the paper ball to go directly through the fourth platform.
The principle of the big wave board in the fifth section is similar to 2-4, and it is not difficult.
Level 5
The first section of this level is very long, and it is like a maze, with all three ball types available. It's easy to get lost on the first try, but once you get used to the terrain, it's not that difficult here. Other sections may seem more complicated, but the moves are all single-threaded, so you won't worry about getting lost.
At the end of the fifth section, there is a wooden ball leap, and you only need to keep pressing the forward button to pass. Other than that, there are no other difficulties in this level.
There are no new objects in this level, but a new surface Modul_16 has appeared. It is a stone surface with a hole in the middle. Tracks are consistent. But unlike steel rails, stone balls can also pass through this road with a run-up.
Level 6
There is almost no logic in this level, it is a map that purely tests skill.
The side rail of this level is different from other levels. The connection between the two rails is completely perpendicular to the horizontal plane, unlike other levels that have a certain angle with the horizontal plane; and the distance between the two rails is larger. So the ball can pass from either side. In addition, because this kind of rail is directly "inserted" into the road surface, there is no iron sheet and screws to fix it.
In the second section, the long-distance convex arch wood is the biggest difficulty of this level, and many beginners are trapped here. Most of them use paper balls here, but the view is blocked by the arch above.
The third section has a very simple shortcut, the paper ball can drop directly on each ventilator and leave without having to change direction through the blower on each side rail.
In the fourth section, the unprotected stone ball passes through the big wave board and needs to go around the transformers.
In the fifth section, the reverse application of cork bridge appears: in this section, according to the original route, the player must first turn into a stone ball and then break the cork bridge to pass. But, the route is not completely blocked here, resulting in the existence of a shortcut for the wooden ball to pass directly. After that, there are narrow and curved large wave boards, but if you don't consider the score ball, you can pass through safely by going straight here.
Level 7
The tilting block and elevator appear in the seventh level, as well as the sideways road surfaces Modul_11 and Modul_15. Both pass methods are similar to side rails, and both can pass stone balls (Modul_15 requires stone balls to run for a long distance).
Continuous side rails also appears, but its difficulty is actually very low, you only need to hold down the two direction keys at the same time to pass.
The third section has a certain logic; think carefully before moving forward, otherwise there may be no way out! (Though several shortcuts exist for this section)
Other than that, there isn't much difficulty in this level.
Level 8
Except that the first section is a little logical and you may get lost in the first challenge, this level mainly tests skills.
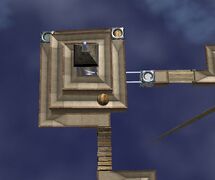
In the first section, you only need to carefully observe the road below near the birth point to easily find the way to leave.
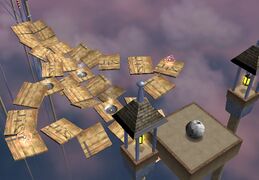
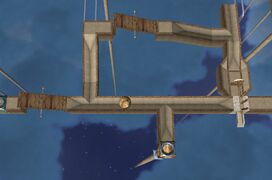
The second section is the only checker grid[5]. Pay attention as to not fall through the hole!
The third section introduces the sandbag. This object often acts as an obstacle. Be careful not to be hit by it.
The fifth section introduces the swing. This kind of object is more dangerous for beginners, so a lower platform is also provided. This is also the only place where the original route of the original level requires the player to pass the swing in the state of a stone ball (though one can just use the wooden ball)
Additionally, this level has two continuous side rails. If one can get through 7-1, it should be easy here. (Press and hold two keys)
Level 9
For beginners, the first and third sections of this level are very difficult.
The first section appears with the stone ball passing through the descending side helix. Just alternate going ↑ → ↓ ← according to the position of the stone ball in the side spiral.
The first lift of the fifth bar can be a trap for first-timers. Push only 3 of the 5 walls.
This level also introduces the 2-flap bridge, and by this level, all objects have been introduced.
Level 10
This level is mainly technical, with a little logic. But the overall difficulty is not high, roughly equivalent to the seventh level, but it is very lengthy, testing the player's mentality and ability to play stably.
The first section is particularly lengthy and is divided into three subsections. It is worth mentioning that the first sections of Levels 1, 5, and 10 that use Music_Theme_1 as the background music are relatively lengthy and are clearly divided into multiple independent subsections.
This level is like a simple splicing combination of various objects, not difficult or challenging, so that there is only one sentence in the help document for this level: "If you made it all the way to this level you shouldn´t encounter any serious obstacles here."</ref>But this level is also slightly magical, and there are some design concepts of road surfaces and rails that are different from other levels.
Almost all objects appear in this level (only the prop wooden ball and turnstile do not appear), so many mappers choose to use the NMO file of this level as the initial map template.
In this level, you can use a glitch to adjust to 45° and pass this level with a stone ball.
Level 11
Level 11 contains 6 sections.
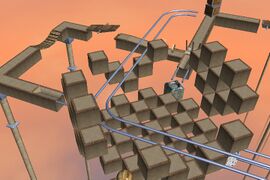
This level is mainly based on logic. This level requires players to think carefully about the logic that combines the surface with the objects. At the same time, there are still difficult technical challenges at the end of the 5th and 6th sections.
This level is also the only original level where the ball can pass directly through the SkyLayer; and it is relatively easy to use paper ball to pass by means of a gheto.
The fifth section is essentially a paper ball going through a side spiral track, so be sure to pay attention.
Level 12
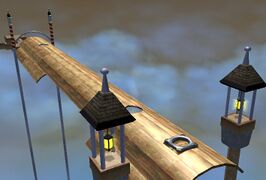
Level 12 contains 8 sections, the most among all the original levels; it is the only level that uses the Maelstrom cloud layer.
This level is the only original level that contains monorails, and players are forced to go on it, which makes some newcomers shudder. The monorail is a bit more difficult for novices, but all the monorails in this level can be aligned. As long as you don't steer on a monorail after alignment, it will not fall.
The ambient lighting of the 12th level is low, only half of that of the other levels.[6]At regular intervals during the player's playing process, there will be short-lived lightning followed by thunder sound effect; also, the color of the rails are yellowish gray, instead of blue.
The monorails in this level are actually not difficult. The oblique fan array in the fifth and sixth sections is more difficult. Players can try to ensure that it is directly in front of the viewing angle every time they go to the next fan, so that it is easy to align.
The seventh section has a certain logic. Try to go to the upper floor in the state of a stone ball to observe how to reach the exit. This section also has a very large amount of shortcuts.
In the eighth section, the original route is for the stone ball to go on the convex wooden arch. Be sure to reach at least the end of the first log to get the extra life. (Or, if you managed to get to this section as a paper ball, you can gheto the stone transformer.
After clearing the level, there will be a Flying Saucer to pick up the wooden ball, accompanied by special sound effects.
Level 13
模板:Main Article Level 13, also known as Speed or SuDu, is an new original level a few months after Ballance was released (September 2004), and it is a downloadable content (DLC). It doesn't require clearing any of levels 1-12 to enter, and it's the only official level that has a map name instead of just a level number.
This level is the most difficult of all original levels, however in the comprehensive evaluation of Ballance bar map difficulty, it only has 2 stars. The difficulty of the other 12 levels is 1 star.
Twilight zone
Before entering the 13th level, you need to enter the "twilight zone" (Twilight zone) under the menu on the game level selection interface. After clicking to enter, the interface will emit the same thunder sound effect as level 12, the menu will disappear, and the background color of the demo level will change to dark blue. The blue vertical lines of the Chinese characters 速度 appear at the intersection of the road surface connecting the three "transformers". [7]When the mouse hovers over it, the color changes to purple, and click to enter the 13th level.
Level Section
There are difficulties in each section of the 13th level, and the difficulties are closely related to the theme "speed" of the level: in the first four sections, the player ball is racing with the prop ball, and the obstacles in the area must be cleared before the prop ball reaches a certain area, or the player has to protect the ball to let it reach the end and help the player clear some obstacles. The player can get bonus points if done faster; the fifth section requires the player to have a very fast speed to pass.
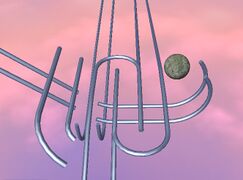
This level requires players to have high reaction ability and operation ability, and in the last section, there is a stone ball helix and a wooden ball reversed helix side rail.
The initial attribute of the player's ball in Level 13 is a stone ball, and except for the last part of the last section, there is no wooden transformer.
After clearing the level, it is the same as the 12th level, and a flying saucer will appear to pick up the wooden ball. However, since the 13th level is the last level, there is no option to "go to the next level" in the menu displayed after clearing the level.
Some areas of this level are obviously poor in detail and slightly insufficient in design. In addition, this level not only has a non possum mori that also appears in other levels, 13-4 even has a serious design flaw of a non possum vivi.
Demo Level
Demo level (Menulevel) is the level (animation) that appears behind the main menu of Ballance. The perspective camera rotates around a platform in the center, and there is a stone ball constantly following a fixed route. The Background of the demo level is the same as the background of the original level 5.
Strictly speaking, the demo level should not count as a vanilla level. Its file name is Menulevel.NMO and it is directly stored in %AppData%\3D Entities. There is no real Ballance level structure in the level content, and the surfaces in the demonstration level are actually just a model, not a real surface.
At present, players in Ballance Bar have produced multiple versions of the Demo Level (Map) that can be used as a self-made map for trial play, but in order to successfully pass the level of this type of map, a large number of self-made ingredients that are not original demo levels have been added.
Players have also successfully produced a new version of the Menulevel animation.
Features
The original levels have certain characteristics that can be different from custom levels, mainly in the layout of the level structure and some basic rules.
Level Structure
Main article: Ballance level basic rules |
The basic structures of a level (the level cannot be loaded without these):
- Division of sections: checkpoint
- Birth or respawn: resetpoint
- Clearance: Balloons
Designs such as objects are also added to the levels. The overall characteristics of levels 1 to 13 are from easy to difficult. The production of Ballance's original levels follows certain principles in terms of details and map design.
Did you know
- There is an officially released Demo version of Ballance, which is free and only the first level is playable.
- There are tips for clearing the first 12 levels in the help manual that comes with Ballance.
- After entering the word "gravity" on the keyboard when in the Credits interface in the main menu, all levels will be unlocked, but this effect is only temporary (it doesn't overwrite the level clearance archive file Database.tdb), so unless any level is cleared, the original state will be restored after restarting the game. It is speculated that it is an Easter egg left by the original author.
- The default initial score of the first level is 1000, while the rest of the levels are only 999. Even if the initial score set in Levelinit.NMO is modified, the initial score of the remaining levels will actually be 1 less. The reason is currently unknown.
- The initial ball type of levels 1-12 is the wooden ball, but its the stone ball for level 13. [8]
- At present, there is a saying that the production of the 13th level is relatively hasty:
- All guardrails in level 13 are missing metal screws; SkyLayer is too high to be displayed[9].
- There is a large section of 13-2 that has no shadows.
- There are two (abandoned) stone transformers at the high altitude of 13-4; if one dies as a stone ball here, there will be a wrong ball softlock, and the level can only be restarted.
- 13-5's stone transformer and extra point are behind checkpoint, and the sound set of the last section of the rail is wrong.
- And because the 13th level is a late release [2], and the production team disbanded shortly after; this statement continues to be supported.
- There is a long-standing legend in Ballance Bar that in a lost version of the Twilight zone, in addition to the 13th level "Speed", there are also the 14th level "Strength" and the 15th level "Ability", but this is merely a myth; there is no evidence of such. But, this also gave birth to the custom series Power and Ability "pseudo", and the Ballance Mod produced by Gamepiaynmo The Loader plug-in directly added the "power" and "ability" selection function.
- The DepthTestCube at the end of Level 7 is not long enough. If the player deliberately goes off the path near the spaceship and continues to move forward, he will bypass the death zone and keep falling infinitely (causing non possum mori).
- It is believed that the difficulty of level 10 is easier than level 9, and it seems that even the production team thinks so.
- Except for level 12, Ballance's built-in leaderboard defaults to "Mr. Default", and the scores are all reduced from 4000 to 400 according to the tolerance of 400. The 12th level is occupied by "Mrs. Default", and the score is reduced from 7000 to 3400 according to the tolerance of 400.
- The speed of cloud movement in different levels is different. For example, level 12 (Maelstrom) clouds move faster, and if placed in other levels, the speed will slow down accordingly. The movement speed of the clouds in level 3 is also faster.
- Certain game bugs can cause the demo level to be loaded into the normal level at the same time. At this time, it can be seen that there is actually no basic level structure in the demo level, and all its objects, including the running demo stone ball, can be passed by the player ball.
- The far section of the road in the demo level is actually the same as the 8-2 Chess Grid, but some faces that the player cannot see are deleted.
Gallery
The first part of the first level is also the starting point of the game
The messy group of boards at the end of the second level
The "Stone ball rollercoaster" in level 3
The "intentional skip" of level 4
The fourth section of level 5
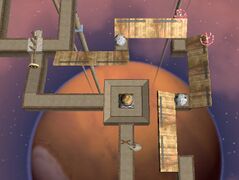
Level 6 section 2 is a nightmare for countless beginners
The first half of the third section of level 7
The checker grid of the eighth level, please walk carefully

The side spiral at the beginning of level 9
Level 10 section 2
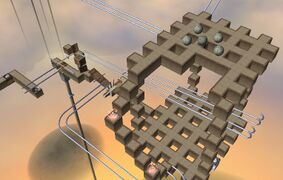
The large structure at the end of level 11
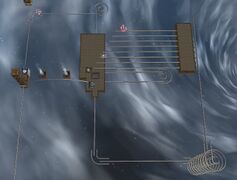
A view of the seventh section of level 12
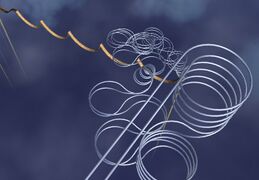
The big spiral at the end of level 13
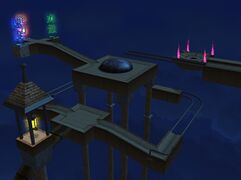
Demo level in the Twilight zone. Note: the "strength" and "ability" plugins are added.


References
- ↑ The link has expired
- ↑ 2.0 2.1 Ballance Developer Homepage (web.archive.org) (October 20, 2007 cache)
- ↑ www.ballance.org - lsaberry shows his skills in the 13th level of Ballance (Although the upload date of the video shows 2007, the corresponding Ballance official website records it as 2004).
- ↑ Using All Levels Patch or the Easter Egg provided by the original version (see the #Did you know section for details) can directly unlock all levels.
- ↑ The same road model also appears at the farthest end of the demo level in the original playable level.
- ↑ Levelinit.NMO shows that the ambient lighting of the 12th level is 7F7F7F, while the rest of the levels are FFFFFF.
- ↑ It is said that this is because there are Chinese speakers in the production team.
- ↑ Can be modified in Levelinit.NMO.
- ↑ There was a saying that there is no SkyLayer because the height and plane distance of this level is too large. However, the test found that the size of the cloud layer in different levels is actually different, and sometimes the difference is very large. It is not a problem to make a larger cloud layer for the 13th level and follow the example of the 11th level to cross the cloud layer. Therefore, the real reason is not clear yet.